Translate

Showing posts with label decoy. Show all posts

Saturday, February 9, 2013

Nearly Done

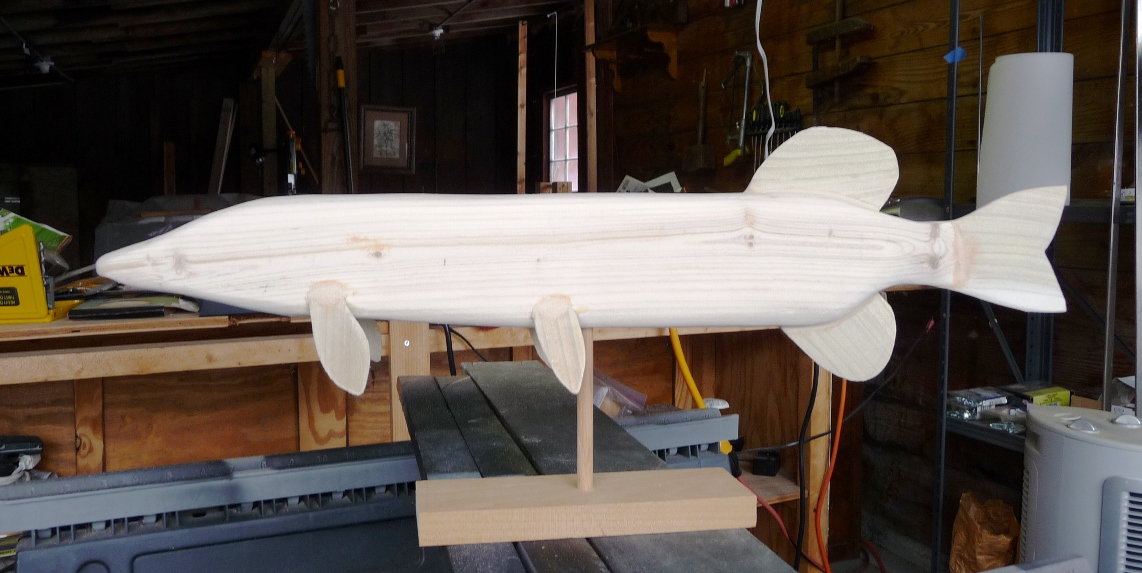
I did the final sanding of the pike carving.  I made a simple stand to hold the carving.  I think it looks pretty good!


I need to let it warm up in the workshop before I can give the pike a coat of primer.  Given the cold conditions we have had lately, it might be a few weeks before I can start the painting.

I'll post the final photo of the painted carving when I get it completed.  Enjoy . . .

Friday, February 1, 2013

Fin Fun

It is very cold outside.  18 degF, blustery snow and wind from the north. Brrrr!  Still, I needed to go to the workshop and spend some time making / fixing / cutting / drilling / carving / sanding / breaking something.

I continued on the pike carving.  Today, I worked on the pectoral and pelvic fins.

I started by making some templates for the fins.


I used the templates to create two pair of fins.  The fins are cut in 1/4 inch material.  I then cut the fins to expose 1/4 notches.


I drilled 1/4 holes into the body of the carving.  I rounded the notches and beveled the base of each fin.  Voila!


I did some trimming of the other fins and the tail.  Now onto the sanding.  I'll sand the body and tail, then move onto the fins.  Then I glue it together and go to paint.


It's getting there!

Saturday, January 19, 2013

Further Adventures of the Pike Decoy

I spent a little more time on the pike decoy.  This time I started on the fins at the tail.  I cut a deep slot in the back to accept a piece of 1/4 inch poplar board for the tail.


I rough cut the tail and made sure it fit snugly in the slot.


I then roughly shaped the upper and lower fins with the 1/4 inch poplar.


I chiseled out two notches for the fins.


I then inserted the upper and lower fins in place.


So far, so good.  I will work on the pectoral fins next.  These will need a little more effort.  Once these are in, I can roughly sand the fins to 'thin' them out, and then work on sanding the body.


Sunday, September 26, 2010

Fall has Come

Though the fall equinox came earlier this week, I always said fall starts when the sumac turns red. . .

. . . and it has!


The  leaves are starting to change.  The maples are already changing.  The maple by the barn is near peak.  I've already started to rake leaves and put them in the compost pile.  The temperatures are steadily falling.  We'll see frosts in a few week.

I finished the puffin decoy.  Overall, I am pretty happy with it.  The hardest part was the bill.  I need to give it a coat of wax or a coat of epoxy.  On to the next project!


Puffin Decoy Before


Puffin Decoy After

Saturday, July 10, 2010

Puffin Decoy

After our recent trip to Alaska, I was motivated to do some more decoy carving.  I've been traveling a lot, and the yard has also kept me busy.  However, it did cool off overnight (a little).  I was going to work in the yard tomorrow, so I decided to head back into the workshop and start on a puffin decoy.

Puffins are a type of seabird found in the Northern Atlantic and Pacific oceans.  I got a few decoys last Christmas from an online dealer known as Duck Trap Decoys.  One of them is an antique Atlantic puffin kt.  Duck Trap Decoys has decent started kits at good prices.  They offer both decorative decoys and working decoys.

The puffin kits is pretty simple.  It has a base, a dowel for support, the roughed-out body, and a bill.  The kit came with a scaled drawing to show sectional profiles and basic paint scheme.


I smoothed out the basic body with a drawknife on the shaving bench,and then started to smooth the edges using a sanding  cylinder on the bench press.  I did some sanding of the bill to fit it to the head.


The basic shape is now done.  This took about 45 minutes.

The workshop started to get pretty warm.  The sawdust was sticking to me as I was sweating, so I called it quits for now.  I'll probably work on more fine sanding / carving tomorrow morning before it gets too hot.

Stay tuned for further updates . . .
Sunday, December 27, 2009

Nearly Done!

We were visiting our daughter the last few days for Christmas. Our visit was too short. I miss her so much!

My wife and I got back late last nite and opened a few gifts we left behind. I now have 3 more decoys to work on (a mallard decoy, a generic small shorebird, and a puffin)! The shorebird and puffin will not be too hard. The mallard has a cork body (it is a real working decoy) so it will take a little more care.

And . . .

I finished the major painting of the merganser.


I still need to add some eyes, accent the piece with black accent lines, and distress it.

Pretty good for a first try. I learned a lot from this decoy. I hope to improve over time. It is nice to work with my hands instead of punching keys on a keyboard and scribbling on a whiteboard (PowerPoint gets old fast...)


Sunday, December 20, 2009

Merganser 3.0


As I looked at the merganser decoy, I decided to square up the tail somewhat, add more curve to the neck, and reduce the height of the body somewhat to make the decoy a little more streamlined. I then finished the fine sanding of the merganser decoy and gave it a coat of grey primer.

Overall, I'm pretty happy with the carving. The texture on the bark helps to define the wings. The lines are pretty good, though next time I would flatten out the tail more and reduce the size of the breast somewhat.

I used a grey primer as the wings on the female merganser are a dark grey. The head will be a rusty red, while the belly feathers are a lighter grey. I still haven't decided how I will do the eyes, or whether I will distress it some more. The body did check somewhat as it dried, so it is starting to have that whithered look.

I won't be working on this until after Christmas. I hope to be finished by New Years. Keep on the lookout for a final photo.

Sunday, November 29, 2009

A Merganser in the Making


I roughed out a merganser decoy today. As I previously posted, I had some wood from my mother-in-law's property which I decided to use for my carvings. I finally got to use my shaving bench. I roughed in the body with power tools and the draw knife. I saw a picture of an old merganser decoy on the Internet which I used as a pattern for the head. I roughed out the head from a piece of 2" pine board. Like the primitive decoys I saw at St. Mary's City, I left some of the bark on the body to give texture to the wing feathers. The wood in the body is very green. I will have to it dry out before I can take this project any further. Once the body dries out, I will mortise a slot in it for the head, and then jump into the shaping of the body and the carving of the head. I will report back in a few months . . .

Saturday, November 28, 2009

Primitive Decoys


We visited family in Southern Maryland this Thanksgiving. I stopped by historic St. Mary's City to look around and visit the gift shop at Farthing's Ordinary (an ordinary was a public house). St. Mary's city was settled in 1636. The historic city is a recreation of the original colonial city which is run by St. Mary's College. It is an active archeological site. There was a lot of history here. We love these type of historic villages (more on some of the places we visited in a later post).

I was looking for books on old barns and structures, woodcrafts, etc. in the gift shop. I came across some folk art primitive decoys. They had a variety of duck carvings, some geese, and a merganser-like bird. They were very simple, and still had some remnants of the bark on the bodies to suggest wing feathers. My mother-in-law had had some trees taken down to clear the woods by her driveway. I grabbed a few pieces of the green hardwood for a few projects. One will be a primitive decoy. Wish me luck.

By the way - one of my draw knives came in! I can start to use my shaving bench now!